
A plaster-in diffuser is not the grille you choose at the end of a project. It is a ceiling decision that has to be made before the carpenter cuts the first opening.
Where system suppliers start from airflow schedules, we start from the ceiling detail: the opening, the radius, the reveal, the finish, and the installation sequence. With plaster-in, every one of those decisions either gets made on the drawing, or it gets made — badly — by whoever happens to be on site that week.
This article is for specifiers writing the ceiling, the trim, and the air terminal as one detail. It is not a how-to-install guide. It is what we think a built-to-drawing diffuser supplier should be telling architects before the spec issue gets stamped.
What plaster-in actually is
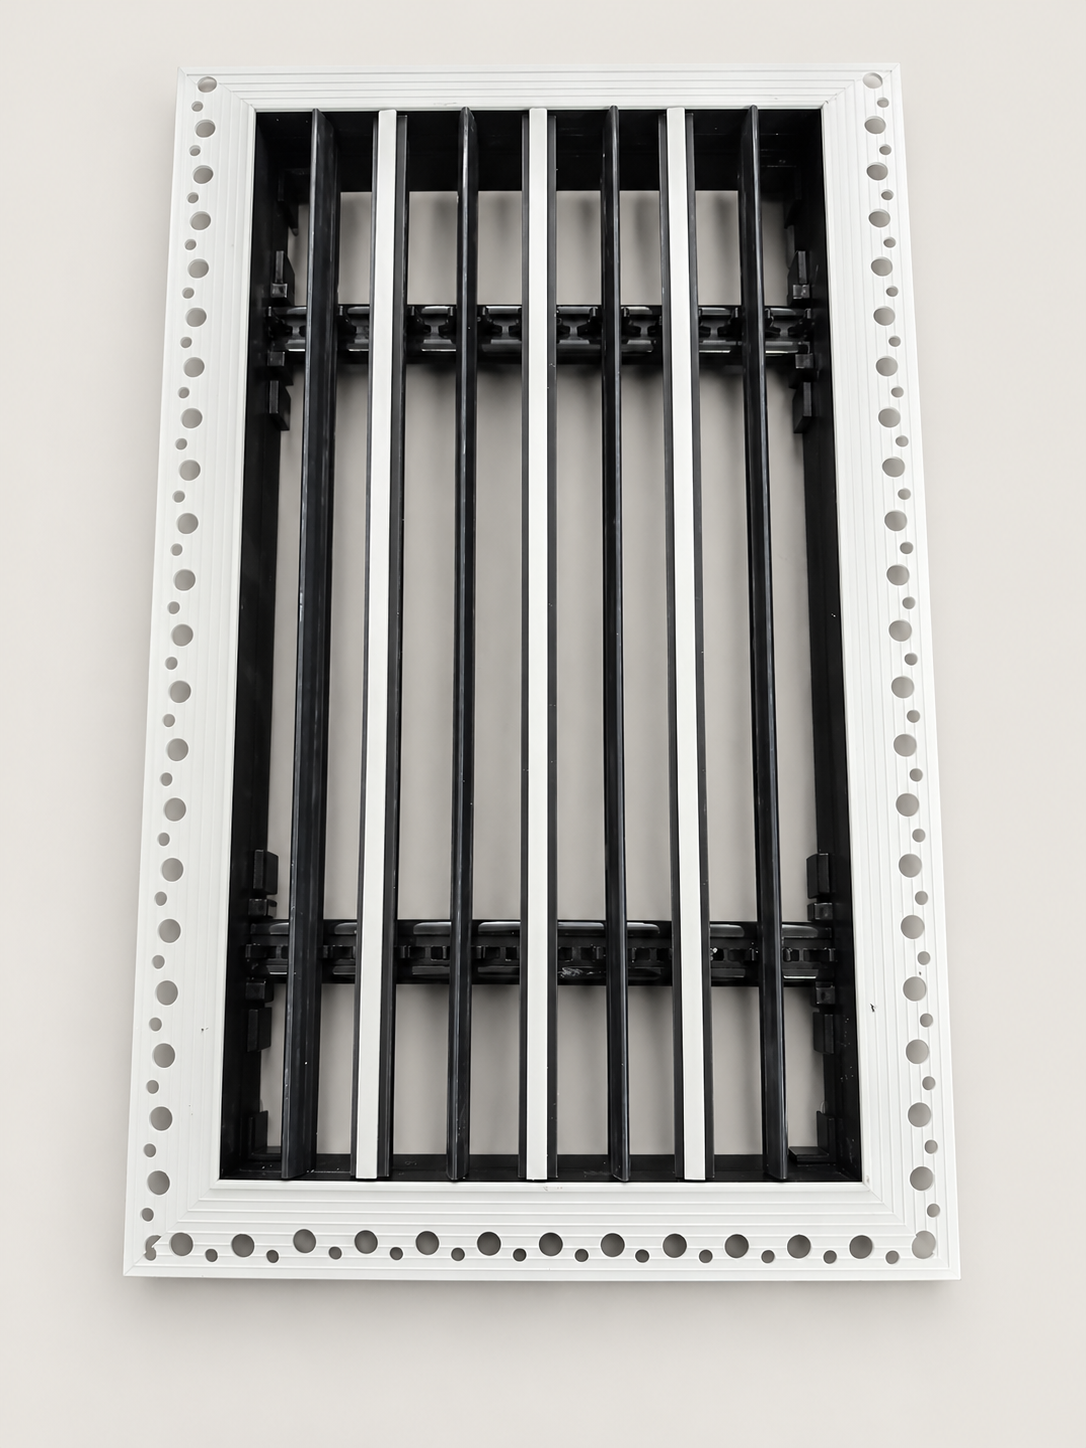
A plaster-in diffuser ships as two separable parts: a perforated outer frame, and a removable blade core that drops in at the end.
The frame is the part that disappears. It is mechanically fixed to the ceiling framing with screws — that is the structural attachment. Its perimeter is also punched with a dense ring of holes, visible in the photograph above, which accept joint mesh and give the plasterer a clean key for the skim coat at the flange edge. Once the tape is laid and the skim is cured, the flange reads as continuous with the ceiling plane rather than as an applied trim. There is no visible bezel because there is no bezel — only the slot.
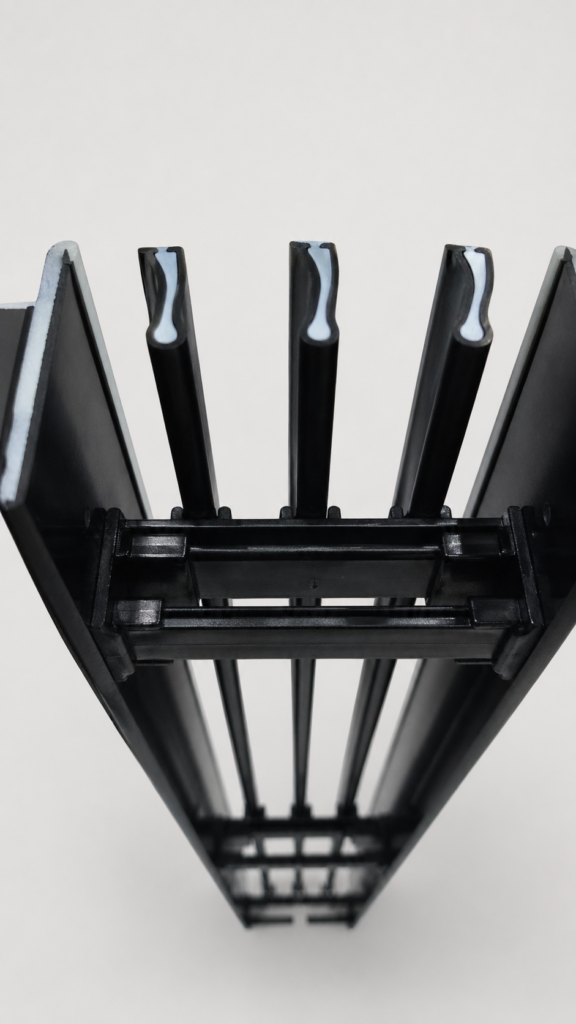
The blade core sits inside the frame and, when specified as removable, can be lifted out for cleaning and adjustment without disturbing the plaster. This separation is the difference between plaster-in done as an atelier detail and plaster-in done as a one-shot installation: the part that has to disappear, disappears; the part that has to be serviced, services.
There are two embedded conditions in practice, and the drawing should specify which one is being detailed:
- Gypsum-board embedded — the frame is installed between two layers of board, before the second layer is closed. The carpenter coordinates the timing.
- Plaster / skim-coat embedded — the frame is installed after gypsum board but before the final skim. The plasterer or drywall finisher coordinates.
A spec sheet that does not distinguish between these two cases is a spec sheet that will produce surprises on site.
Why four trades need to talk before any of them start
A plaster-in diffuser is the most coordination-dense air terminal an HVAC specifier can write into a job. Four trades touch it before it is finished:
- HVAC supplier — manufactures the frame and the blade core, delivers in two phases
- Carpenter — cuts the opening to the drawing and, on gypsum-board jobs, builds the substrate around the frame
- Plasterer or drywall finisher — keys the perimeter, runs the crack-prevention mesh, lays the skim coat
- MEP installer — connects the plenum, sets the duct geometry, confirms blade-to-airflow orientation
If any one of these four works in isolation, the detail fails — not because the product was wrong, but because plaster-in is a ceiling detail performed by four people, and the diffuser is only one of the four.
This is not a complaint about construction. It is the universal physics of the detail. A perfectly fabricated frame cannot fix a non-square opening. A perfectly applied skim coat cannot bridge a frame that arrived after the second board layer was already closed. A perfectly designed blade core cannot fix an airflow mismatch the MEP installer discovered after the slot was already plastered shut.
The conventional sequence on a fast-tendered project is to push this coordination down the chain — the architect names the air terminal, the contractor figures out the rest. For plaster-in specifically, that sequence is the wrong way around. The plaster-in conversation should start at the spec stage, with the diffuser supplier in the room.
What that looks like in practice is unglamorous. It is a one-page drawing markup with opening dimensions, depth, the embedded condition, and the timing node circled. It is the kind of pre-fabrication note that some studios issue as routine and others have never seen. Either way, it is the difference between a slot that disappears and a slot that does not.
The eight-step install sequence, read from a specifier’s chair
The install sequence below is typical for plaster-in work. We have annotated each step from a specifier’s view — what to call out on the drawing, what to confirm before fabrication, what to watch for during coordination.
1. Carpenter cuts the ceiling opening per drawing; verifies rectangularity and dimensional accuracy.
The drawing must show finished opening dimensions, outside frame dimensions, and depth available in the ceiling void — not nominal size. A slot called “1200 × 100” without depth is a slot that has not been specified.
2. Frame delivered to site before the plaster phase.
Lead-time logic for plaster-in is different from surface-mount. If the frame arrives at the same lead time as a standard linear slot, it will arrive after the ceiling is closed. The delivery should be coordinated to the embedded timing node, not to handover.
3. Frame mounted, leveled, and screw-fixed; spirit level on long runs.
On runs above two metres, level matters more than people expect. Plaster will not correct slope. A small drop across a long slot is visible from below as soon as the floor is finished and the eye runs the line.
4. Frame-to-ceiling joint treated with crack-prevention tape or mesh.
This is the line that fails first under thermal movement. Mesh and tape are the plasterer’s job, but unless the spec calls for them, they get dropped — particularly on smaller projects where the plasterer is also doing the rest of the ceiling and treats the diffuser as one more cut-out.
5. Plaster or skim coat applied over the flange and mesh.
The perforated flange and the joint mesh together give the plasterer a clean transition between the frame and the surrounding board, so the skim feathers out flush rather than reading as an applied edge. An over-troweled application can still create an irregular margin that is harder to flush out at final paint.
6. Dummy / backing sections painted dark to prevent white show-through.
The most overlooked detail in the whole sequence. The blade slot reads as one continuous line from below — until the plenum behind it shows white between the blades, at which point it reads as a strip of holes. Dark or shadow-treated backing is a one-line note on the spec that saves the visual outcome of the entire detail.
7. Paint protection removed after the final paint cures.
The slot edges should be masked during wet trades and unmasked after final paint. A diffuser delivered with a clean unmasked face is a diffuser the painter will catch with a roller.
8. Removable blade core installed last.
The blade core is the visible part. It clips in after every other ceiling trade has finished — and it is also the maintenance access point for the life of the building. We come back to that in a moment.
Six places this goes wrong — at spec stage, not on site
The failure modes below are well known to plaster-in installers. They are less well known to the people writing the spec, which is where most of them can be prevented with a one-line note.
1. Out-of-square opening.
A trapezoidal or parallelogram opening will not seat a rectangular frame cleanly. The drawing should specify rectangularity as a tolerance, not as an assumption.
2. Insufficient depth.
Common reference figures for plaster-in installation depth fall in the 35–40 mm range, but actual depth is profile-dependent and project-dependent. The drawing must coordinate depth against the structural ceiling, MEP services, and any recessed light fittings sharing the same plane. Depth is the single most common reason a plaster-in detail has to be re-ordered after a site visit.
3. Joint cracking.
The frame-to-ceiling joint is the first place a thermal-movement crack appears. If the spec does not call for crack-prevention mesh and tape, the line will tend to crack within the first one or two heating cycles, and the entire detail will read as a hairline scar around the slot.
4. White backing showing through dummy sections.
On long continuous runs, the run is usually broken into served and dummy sections — only some of the slot length actually delivers air. If the plenum behind the dummy sections is left white, the eye reads the slot as inconsistent. Specify dark or shadow-treated backing for the full slot length, not just the active sections.
5. Excessive or uneven plaster around the perimeter.
The perforation ring is designed for a controlled bead. A heavy, freehand application can skew the frame, push the blade alignment out of square, or create an irregular shadow line. This is a site coordination issue, not a product issue, but it is one that should be flagged in the pre-construction meeting rather than discovered at snagging.
6. Repeated access wear at the edges.
If the project requires frequent maintenance access — high-grease kitchens, healthcare cleanrooms, anywhere with a quarterly clean-down regime — plaster-in is the wrong detail. The frame edge cannot be repeatedly disturbed without showing repair marks. A recessed reveal frame is the right answer, and the visible reveal line is the price of serviceability.
The pattern across all six is the same: every one of them is a spec-stage decision that, if made early, costs nothing, and if deferred, costs the whole detail.
Counter-intuitively, easier to maintain in the long run
The most common reservation we hear from specifiers about plaster-in is that it locks maintenance access out of the ceiling. The frame is plastered in, so the diffuser is plastered in — and that sounds like a single-cycle install.
The reverse is closer to true.
The frame is the part you wanted to disappear. The blade core, which is the visible slot, clips out as a single unit for cleaning. Individual blades clip out for inspection, replacement, or finish refresh. The serviceable part of the diffuser was never the bezel; it was always the blade insert. Plaster-in just locks the bezel in place permanently — which is what you wanted in the first place.
A short Q&A we have given to specifiers more than once:
Is plaster-in harder to maintain than a screw-down frame?
In the short run, marginally — there is no removable bezel to lift out. In the long run, no, because the bezel was never the maintenance-cycle component to begin with.
What happens if a blade is damaged?
The blade clips out of its carrier rail and is replaced as a single piece. The plaster is not disturbed.
What about reaching the plenum?
Through the slot opening for small-scale access, or through a separate ceiling access panel coordinated with the MEP layout. The diffuser should not be the access route to the plenum on any project with serviceable equipment behind it.
What we need on a drawing
A plaster-in diffuser cannot be ordered against a part number. It is built to drawing. The minimum information required to start fabrication, in our practice, is the following:
- Finished opening size — length × width, post-skim
- Outer frame size — coordinated with the carpenter’s cut
- Installation depth available in the ceiling void
- Ceiling build-up — board count, skim type, board thickness
- Embedded condition — gypsum-board between layers, or plaster post-board
- Access requirement — one-off install vs frequent maintenance
- Blade direction and pattern — single slot, multi-slot, blade orientation
- Finish colour — matte white standard; custom-matched on enquiry
- Carrier-rail geometry — straight, curved, or with corner mitres
A drawing with all nine confirmed is a drawing we can build a plaster-in to. A part number, on its own, is a drawing we cannot build to. We say this as plainly as we can because catalogue ordering and built-to-drawing fabrication are two different procurement routes, and plaster-in lives entirely in the second.
For most atelier projects, the nine items above are already on the architect’s reflected ceiling plan. We just need them confirmed on the spec issue, before we cut carrier rail.
Closing
A plaster-in detail is one of the few air terminals where the diffuser supplier belongs in the room at design development, not at tender. The slot does not disappear by accident. It disappears because the opening was cut to the drawing, the frame arrived on the right day, the perforations got their plaster, the mesh got laid, the backing was darkened, and the blade core dropped in last.
Built to drawing — not pulled from a catalog.
If you are specifying a ceiling where the slot needs to read as one continuous line and the frame needs to be invisible, the conversation starts at the drawing. We would rather have that conversation early than reverse-engineer it from a site photograph.
Hongyang HVAC is a small-batch architectural air terminal workshop in Jiangsu, China. We build linear slot, curved, and plaster-in diffusers to drawing for atelier and specifier-led projects. Start a project →